Engine Questions
1/13/14 Squish/Quench distance, compression ratio, deck height and head gasket thickness
Question from Jean Pierre on head gasket thickness, deck height and compression ratio.
The engine is B20B with a 2130cc upgrade from IPD. The deck height is stock as well as the stroke. I used a thicker gasket from IPD as the thing pinged like mad before it. Now the one thing to keep in mind is that in California we only have 91 octane gas.
Answer
For the head and compression ratio its important to know exactly what the deck height is.
" Stock " deck heights varied widely from as little as .005 to as much as .035. Further your engine is no longer stock as it has been rebuilt at least once. The proper way to do this is to set the deck height at the time of a rebuild as its normal practice to mill the top of the block at least to make sure that its flat at the time it is machined. So we will need an actual measurement of the deck height before the head is finished and we should have an actual bore measurement at the same time.
One of the worst things that you can do for engine efficiency is to use a thick head gasket. All engines are designed with a " squish or quench area " - a flat area on the head outside of the combustion chamber. This flat surface is designed to be a certain distance from the top of the piston at top dead center - the squish or quench distance.
The purpose of this area is to create turbulence in the combustion chamber which promotes among other things a complete burn of the gas mixture. It also makes the engine less prone to pinging - detonation. When you put in a thicker head gasket, enlarging the distance from the squish area on the head to the top of the piston, you reduce the squish action that creates the turbulence and makes the engine more prone to detonation. For a B20 engine the optimum squish distance is approx. .035. So with a .035 head gasket ( the thinnest stock type gasket now available ) the deck height should be close to zero. So the proper way to do this is to mill the block to close to zero deck height and then set the compression ratio by milling the head ( to increase it ) or enlarging the combustion chamber to decrease it.
3/11/11 - Question - what oil should I use?
I have included here a question from the Mobil Oil website and their answer, followed by my comments.
| Question: |
| Does Mobil 1 Contain the Additive for Flat Tappet Cams? |
| I build a few engines a year as I do muscle car repairs and I have been having a lot of camshaft failures. I just read that it is because the oil no longer has the additive for flat tappet cams. Can I use Mobil 1 to break in fresh rebuilt engines of '60s and '70s tech? Is it too slippery for new ring break-in? Will it give protection on new cam and lifters? |
| -- Frederick Neidlinger, Dover/Dover AFB, DE |
 |
| Answer: |
| For older, flat tappet engines where wear may be more of a concern, we offer a number of oil products which are higher in phosphorus than API SM/ILSAC GF-4 oils. These include Mobil 1 15W-50 (1,200 ppm), Mobil 1 0W-40 (1,000 ppm) and Mobil 1 High Mileage 5W-30, 10W-30 and 10W-40 (900 ppm). For all newer engines and flat tappet engines in normal service, API SM/ISLAC GF-4 oils are preferred for better fuel economy and for the protection of catalytic systems with lower phosphorous (800 ppm). See details on our chart - http://www.mobiloil.com/USA-English/MotorOil/Files/Mobil_1_Product_Guide.pdf |
In general newer oils labled SM and SN, in order to meet those standards have smaller amounts of the zinc and phosporus additives that were in SL and older rated oils designed for older flat tappet/lifter engines. We strongly recommend using oils that have the older/higher levels of these components in all of our engines. For break-in, even higher levels may be beneficial and we use break-in additives, such as Lucas break-in additive. We also use a petroleum based oil for break-in, on the theory that the rings will seat better and faster with an oil that is less "slippery" than the synthetic oils. We also change the oil once or twice during the first couple hundred miles, and this can get expensive with synthetic oils. For many years we have used Mobil 1 15W-50 in our race engines. These engines have been designed for use with multi-grade oils. We do not recommend the use of straight 50 weight race oils. Mobil 1 High Mileage 5W-30, 10W-30 and 10W-40 are listed as of April 2013 as having phophorus and zinc levels of 1000 and 1100 PPM.
3/9/11 - Question - Which head gasket to use.
John , I just want the best gasket, Cometic or Elring/Volvo, in the thickness application you recommend for your head & engine .
Richard,
The confusion as to why we use different brands of gaskets for different engines is base on the fact that certain sizes are available from one manufacturer, and other sizes from the other.
.028, .030, .036 Cometic - .034, Elring/Volvo.
We chose the gasket based on the size we need ( or is best, closest to what we want ), and that usually determines the manufacturer. In your case the bore is not an issue as we can get the right bore from either. ( For larger bores we have to go with the Cometic gasket because we can get them in 92, 93, and 94 mm bore sizes. ) So the issue is thickness and setting up the proper quench/squish distance. This is the compressed gasket thickness plus the deck height and is critical for efficient combustion.
Minimum would be .030 on a 3.5 " bore race engine. ( We normally want a little more on a street engine using stock rods. ) Ideal is between .032 and .034 allowing a little greater safety margin. From .035 - .040 is useable, but not ideal. Over .040 we normally consider too much - though its not unusual on 4" bore motors where they have to allow more clearance due to more piston rock with the larger bore. Its all about optimising the engine and a few thou here and a few thou there all add up to improvements if they go in the right direction, worse performance if they go in the wrong direction.
So if you have at least .003 of deck height, the .030 gasket from cometic would be ideal, giving a squish distance of .033.
Next choice, and good if you want more clearance, would be the .034 gasket from Elring.
All problems with head gaskets in these engines are due to overheating the engine and/or improper installation.
Regards,
John
Vintage Performance Developments
5/24 Question - valve adjustment
Monday, May 24, 2010 2:18 PM
Subject: Re: Volvo Engine
Sorry this is probably a dumb question but I should adjust both valves to .018 at TDC for each cylinder. Right?
Answer -
Much better to do it this way:
Nines method
============
With valves numbered from front to back.
1 - Roll engine until #8 valve is fully open, adjust valve #1.
2 - Roll engine until #7 valve is fully open, adjust valve #2.
3 - Roll engine until #6 valve is fully open, adjust valve #3.
4 - Repeat until all 8 have been adjusted.
(The # of the open valve plus the # of the adjusted valve always add up to 9.)
5/22 Question - Engine Break-in
Hi John,
Bruce Prior here. You built me a 2.3 liter engine which I now have installed and got started the other day.
I need to know what to torque the heads to and what to adjust the valves to. Are they the regular settings in a manual?
Also, you said you would give me break in instructions.
Anything else you can tell me would be great.
Thanks.
Bruce
Answer
First and most important - do not run the engine under 2000 rpm for the first 20 minutes of running. Run it from 2000 - 3000 rpm with light or no load.
Shell Rotella T 15 w 40, non synthetic, is a good breakin oil.
Retorque the head to 75 ft lbs. and readjust the valves to .018 after initial running.
Use a cam break-in additive such as from Lucas Oil or Comp Cams.
Drive normally for first several hundred miles, but avoid long stretches of highway driving where the rpms will remain steady. Mild to moderate acceleration is good for breakin. Very high or very low rpms for extended periods of time are bad.
After 500 miles change the oil to a synthetic oil such as Mobil One 15 w 50
The key is to use an oil that is high in the zink and phosphorus additives needed for flat tappet ( lifter ) and cam lubrication. Most modern oils have had the levels reduced due to emissions and 02 sensor requirements.
John
Vintage Performance Developments
2/9/10 - Use of Core Engines
Q -
Hello John,
> I was reading the news in your web page, it looks like you are busy
> building engines; my question is, are you using my core engine to
> built my motor, and if so when do I need to ship my core to you?
Regards,
> Mario
A -
Unless there is some special reason to designate a block as belonging to a particular customer, once core engines get here they are just another core to be tested, evaluated, and designated for a particular engine based on the qualities we find in each block. An advantage of this is that you will not be stuck with a "bad core". We test and inspect every block that comes in. Cylinder wall thickness is tested in 48 different locations - 12 per cylinder - to be sure that the cylinder walls are thick enough for the particular application whether it be a stock bore, .030 over, or .160 overbore.
So your engine will probably be built from one of the cores that you may have seen in the photos. Most of those blocks are being align bored this week, and cylinder boring will start next week.
What we are in short supply of right now is good cranks.
I just picked up two more yesterday.
If you are planning to ship an engine or engine parts to be used as cores, it would help here if you could do that as soon as possible rather than waiting.
Regards,
John
VPD
9/25/09 Keep the B18 or Switch to a B20
Q -
I'm starting to plan a new engine for a 63 Jensen p1800. I'd like to keep a B18 under the hood for aesthetic reasons. I'd be thrilled to have an engine in the 150 HP range. Is this a bit much for the B18 while still keeping a budget? Should I just go with a B20 and call it done?
I'm not opposed to stroking that engine if need be.
What would you recommend?
Keir
A -
Keir,
The only aesthetic difference between a B18 and a B20 is that one says "B18" on the driver's side near the distributor and the other says "B20". Otherwise they are interchangeable.
If you have to have that original B18 block, then the way to go is to bore out a B18 block to B20 specs after first checking that the walls will be consistently .120" thick after the overbore. With the right cam and head that could get you into the 150 HP range. Our stroke it for more displacement if you need to get up to 170 HP. For either option you will need a B20 head, but there is one that looks just like a B18 head, though it does not flow as well as the B20 injected head.
So it all really depends on budget issues, starting with a B20 is the least expensive way to go.
John
9/1/09 Why is my car so slow?
Q -
I have a '69 Volvo 1800S, that is essentially stock, with two very minor exceptions. The engine was overhauled a few years ago, and I used the D-grind cam. I replaced the original Stromberg CD carburetors with an IPD kit Weber 32/36 DGV. With this set up, the engine seems very sound - starts easily, idles mostly OK, fuel economy in the mid 20's, etc, but dead slow.
Your web site quotes 0-60 times of around 13 seconds for a stock car, and auto magazine reports of the period seem to agree with that. My car is nowhere near that quick - more like 20+ seconds to 60.
My questions are:
- Is the smaller Weber carburetor likely to be the issue here? It appears that the Weber is only a little larger than one of the original carbs, and wouldn't provide nearly the air flow of the original dual-carb set up, but it is hard for me to believe that it is this serious a restriction. Of course, a 40-year old distributor may have a bit to do with it also.
- Your web site talks about the Mikuni set up as using either 42 or 45 mm carbs - which would you recommend for a basically stock engine?
- If I wanted to do a little more than the Mikunis, would you suggest headers, or the street performance heads as the second stage mod? Does that change the answer to Q. 2?
- It used to be that practically every auto shop that could afford a painted sign had a distributor bench, but with the advent of electronic ignition systems, they seem to have gone the way of the dodo bird - might even be hard to find a mechanic who knows what a distributor bench is. Do you have the ability to check out my old distributor, or do you know of a shop who does? Or would I just be better off including your 123 distributor in my budget plans.
In answering these questions, keep in mind that I am not trying to build a street racer. If I could get back to solid, stock, original performance, I would be pretty happy. Your 150+ horsepower engines sound appealing, and 7 second 0-60 would definitely be fun, but I just don't want to get into that major a project (or expense). I appreciate any advice you can give me - I already learned a lot just from reading your web site.
Thanks
Jim
A -
20 second 0 - 60 means that something is seriously wrong.
We have had cars come into the shop that slow and sometimes it is something comparatively simple, somtimes something more complicated and more difficult to fix. The valve lash and distributor would be the first things that I would check.
Things to check or do, including the distributor and valve lash, include the following:
Compression check
Leakdown test
check the cam lift for each lobe
check the valve lash
check the distributor on a distributor machine ( A simple prelimary check is just to see if there is any play in the rotor shaft.)
We have a shop nearby that can do distributor checks, and if you want to send yours we can have it checked. However, if it is the original distributor its about 90% certain that it has significant wear. That's why we recommend the 123 distrbutor instead of add - on points replacement electronics that retain the original distributor.
I would find out what's wrong with the engine first before adding things.
Unless the weber tune is way off, it would not cause the poor performance that you relate. Once you find out what the current problems are, then going to the Mikuni kit would make sense in order to replace the weber.
With the stock head, the stock exhaust manifold should be fine as long as it has decent exhaust system attached.
The largest improvement in engine performance is going to be obtained by replacing the head with one of our performance heads. I would go to header at the same time as changing heads.
42 mm mikunis for the engine with stock head, a choice of 42 or 45 for an engine with our street performance head and cam.
Regards,
John
Vintage Performance Developments
6/12/09 Head Gasket Thickness and Compression Ratio
Q - As for a B20 E head gasket, can I use the stock thickness to retain the stock compression ratio. The block does not have any indications of being milled before, so I think everything should be fine with a stock gasket.
A - The stock thickness head gasket for a B20E is no longer available. Even if it were you would not have the "stock compression ratio " because you do not have a stock bore. With a stated bore of 3.642 ( 92.5 mm ) you would have a much higher ratio than stock, too high for the pump gas currently available, assuming that other dimensions are similar to stock. The stock ratio was 10.5 to one for a B20E. ( We are assuming that it still has a B20 E head on it ? ) That was calculated with the original head gasket, a stock bore, and a stock block, crank, and pistons.
Another variable is that you are going to be using an 8 bolt crank, rods, and pistons in what you believe to be an earlier b20 ( 6 bolt ) block. You have no way of knowing that with the new parts the deck height is going to be anywhere near what it was to begin with. ( We have found that they can vary by as much as .030 in stock engines. ) You also have know idea whether the head and or block was milled when the last work was done on it, before you owned it. So unless you want to risk having a real mess, measure the deck height ( see the Articles/FAQ section of our website for info on this ), measure the combustion chamber volume, and compute the actual compression ratio - or give me the numbers and I will do it. Then decisions can be made as to what head gasket to use and whether other modifications are needed to get a reasonable squish area measurement and useable compression ratio.
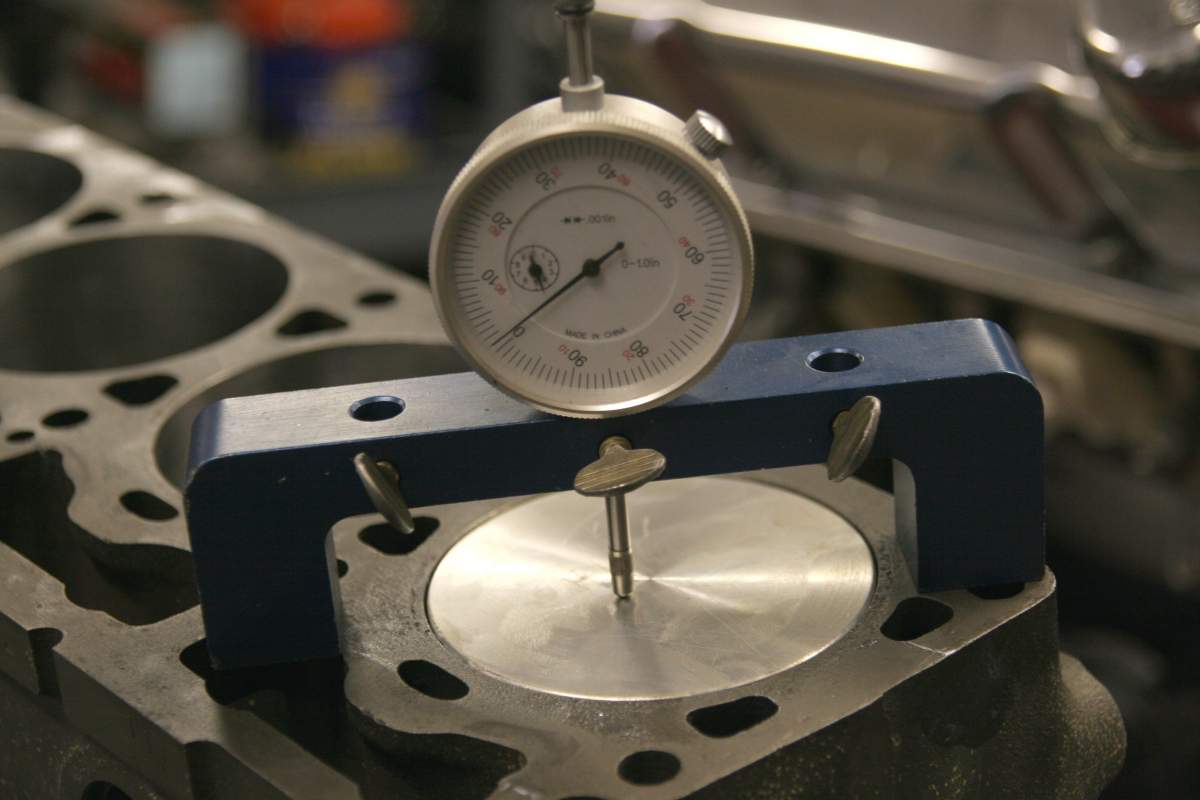
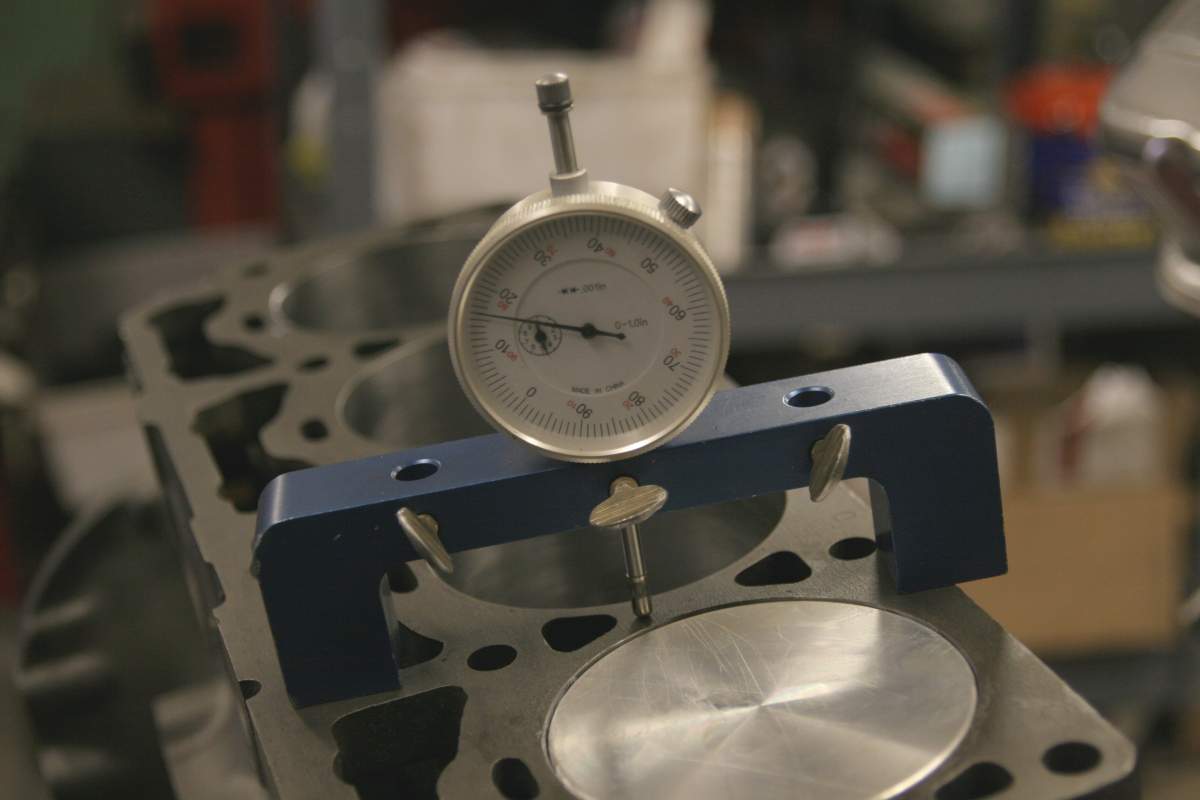
6/8/09 - Deck Height Mearsurements
Q - How do I determine deck height ?
A - Measure the difference between the height of the piston at top dead center and the deck surface of the block. See the photos. Its also possible to do the measurement with a flat edge and feeler gauge. Simply place the flat edge across the top of the block and piston, bring the piston up to top dead center, and use the feeler guage to measure the distance between the top of the piston and the straight edge. This procedure should be done for each piston as there are sometimes differences, especially from on end of the block to the other.
Transmission Swaps
5/31/09
Q - I was considering a T5 swap into my 64 121 and was wondering what parts I would need?
A -For a 64 121 I would suggest that you use a T9 instead of the T5.
The T5 is going to be too wide at the top for the trans tunnel. Although the trans tunnel can be modified to fit, it will be easier to install the T9.
For either installation you would need an adapter plate, slider yoke, and clutch disc with the correct splines. For the T5 you would also need a modified clutch fork and Ford release bearing. Listed below are the parts and prices for the typical T5 swap.
B20 T5 adapter prices:
Adapter plate -1 inch - $175
Modification to cable or hydrualic clutch fork - $40
Clutch fork core charge if not supplied - $50
Ford release bearing - $50
Special pilot bearing for V8 T5 - $25
Heavy duty clutch disc with Ford 1 1/16 x 1" splines - $140
Total: $460
5/2709
Q - I was wondering if the parts from a T5 are similar to the T9 internally.
A - There is no commonality between the two transmissions that I know of. Basically the T5 was made for Ford in the US by Borg Warner and is now made by Tremec. The T9 was made for Ford in Europe. It is the most commonly used transmission in kit cars and for upgrades from 4 to 5 speed in older sports cars.
Running On
6/7/09
Q - Installed your dual Mikuni carb kit on my 79 MGB in place of the single ZS carb. I am having trouble adjusting it. It needs a lot choke to start and runs on when I shut it off.
A - (As the car was not far away I took a trip to see what the problem was.) The pilot air screws could not be adjusted rich enough to give the car a decent idle so I suspected a vacuum leak. It turned out that the breather hose from the block was hooked into the intake manifold, causing what was essentially a vacuum leak. Blocking off the hose was a temporary fix allowing the carb pilot air screws to be turned back to the factory adjustment of 2 turns out. A permanent fix will be to rout both the block and valve cover breather hoses to the air filters.
5/29/09
Q - On a B18 I have a problem with the running on when I shut off the engine. Do I need to reduce compression ratio?
A - First, try retarding the ignition timing, using higher octane gas, and running a cooler thermostat.
The problem is sometimes caused by a worn out distributor where all four cylinders are not firing at 90 degrees from each other - one or more may be advanced or retarded even though the timing for #1 seems right. When you time it, is the timing mark steady? A timing mark that moves around is an indication of a worn distributor. Another issue could be a lean mixture which could be caused by vacuum leaks, which could be from the carb throttle shafts.
Head Porting
6/9
Q - I am certainly tempted to send you the head, because I know you will do it right...but I am also very tempted to look into porting the head myself. I know what you are going to say: DON'T DO IT! I have a very serious desire to learn more about head porting though (I once ported a Briggs & Stratton go-cart motor successfully), and I have confidence that I could do it with the right information. I have read several in-depth articles, and a fellow mechanic ported his own and gained noticeable power. I suppose asking your advice on what areas need the most attention is a little like asking a Texan for his secret BBQ recipe, but I'll ask anyway! Would you be willing to make suggestions so that I can have the pleasure of learning and the pride of accomplishing it myself? I am adult enough to realize that I need to experiment on a bad head first, and I know that there is still the reality that I might screw it up...let me know what you think.
A -
Some heads are comparatively easy to do some basic porting on as what needs to be done is pretty obvious.
Volvo B18/B20 heads are hard to port as what seems obvious is actually the wrong thingg to do.
The only way you can find this out is to actually do some porting and then check the result on a flow bench.
So I suggest that you do it this way. Take a scrap head, exactly like the one you are going to use, with similar core shifts, and have the flow checked. Then port it like you think will work and then have it checked again to see if you were right. You are probably better off doing it one port at a time so you have more chances to get it right. If you do a port that works, then try to do the same thing on the next one. Once you have been able to duplicate it, then do the same things to the head that you are going to use.
Above is the best suggestion I can give you on how to do it.
If you were standing here next to me and we were looking at heads sitting on the bench in front of us I would tell you the same thing. You simply have to develop an eye and a feel for what needs to be done and how one port is different from another.Part of this is due to the common core shifts in the head, so where that one port needs more taken off on the left, another needs more taken off on the right, or the front or the back, etc. So I would actually have to see and feel your head in order to tell you where material needs to be removed.
Another problem is that all parts of the port have to work together. You can improve the flow at one point in the port, but if that is not matched by an improvement at other points, the improved flow can cause the air flow to separate from the port wall, start tumbling and create turbulence. On the intake ports this is typical and is the reason that it really needs to be done with regular flow bench checking. Very small changes in the port shape, particularly on the inside radius make all the difference and some shapes that don't look like they will work, in fact do.
If you don't have at least one head to practice on, have no access to a flow bench, and can't afford to put the engine together and find out that the head leaks water, then don't do it.
BTW, when I do a head, only a small portion of the time goes into the actual porting. The rest of it goes into installing hardened exhaust seats; milling the combustion chambers to unshroud the valves; cutting the angles on the valves; cutting seats in the head; removing and installing valve guides; reaming the guides to the proper size for each valve stem; removing the soft plugs, removing checking and reinstalling the brass coolant tube that runs the length of the head; reinstalling the soft plugs; vacuum checking the ports to make sure that there is a good valve to seat seal; flow testing the ports to make sure that they flow up to spec for the specific head type; measuring the size of the combustion chamber; calculating the size of the combustion chamber that will give the desired compression ratio; milling the head to produce the desired combustion chamber size for the desired compression ratio; and a few other things that I have left out.
5/30/09
Q - There's a local Formula Ford guru here at Infineon that does headwork. Can I have him follow his own experience to head port a b20 F head?
A - He might have enough experience and take enough time to do a good job, but almost all of the heads I have seen done by people who do headwork, but do not have extensive experience in doing Volvo B18/B20 headwork, have been less than satisfactory. You need to do at least several of the same head in order to work out what techniques work best on these heads, and after that its a question of degrees - how much is an improvement without going too far. Its a process that usually requires several "test" or "scrap" heads to experiment on before you can do one for a customer. Then you need to test the result in the "real world" as high flow numbers do not always result in commensurate power increases. The head also has to match the cam and other specs of the motor its going to be used with.
Its also a process made a lot more difficult by the casting core shifts in these heads.
Each head is actually a little different with combinations of up/down, right/left, and front/back shifts, so the ports are not equal to start with. One thing you have to be able to be able to do is differentiate a good head core from a poor one just by looking at it.
MGB Carb Upgrade
6/7/09
Q - Installed your dual Mikuni carb kit on my 79 MGB in place of the single ZS carb. I am having trouble adjusting it. It needs a lot choke to start and runs on when I shut it off.
A - (As the car was not far away I took a trip to see what the problem was.) The pilot air screws could not be adjusted rich enough to give the car a decent idle so I suspected a vacuum leak. It turned out that the breather hose from the block was hooked into the intake manifold, causing what was essentially a vacuum leak. Blocking off the hose was a temporary fix allowing the carb pilot air screws to be turned back to the factory adjustment of 2 turns out. A permanent fix will be to rout both the block and valve cover breather hoses to the air filters.
5/31/09
Q - What are the best carbs or carb to use on my MBG?
A - I usually do the answers, but where there are good answers from others I will post them here. See the answer given below on an MGB forum. - John
True the Zenith carbs can be tuned to give reasonable performance, but asused one at a time on rubber-bumper Bs and other contemporary B.L. cars they tend to be underwhelming in terms of performance. The single ZS on my ' 75 Midget was a public menace. The car wouldn't pull the skin off a rice pudding. When I replaced it with a pair of 1 1/2" SUs on a manifold from an earlier Spitfire the little engine just came to life.
Seems to me the stock carb on a rubber-bumper B gave a manly 65 or 66 bhp.,hardly what one would expect from a car with sporting pretentions.
That being said, I'm not a great admirer of SUs either, having spent many a happy hour replacing worn throttle shafts, bushing oval holes in carb bodies, even converting the things to ball-bearing shafts. The mobile-jet chokes are primitive to say the least. New SUs are expensive ( at least inCanada), and quality of the examples I've seen in recent years has not been impressive either, much like new Amals for classic bikes.
As mentioned in a prev. post, when I put the fresh engine in my ' 70 B-GTat 100,000 miles I chucked the SUs away and replaced them with a pair of HSR42 Mikuni flat-slides. These are simple, reliable, very well made unitsusually used on bikes ( particularly hotrod Harleys). They cost me less than a new pair of SUs, fit on the stock intake manifold quite neatly, and outperform the SUs by a wide margin.
Stock carbs for the pre-rubber bumper Bs were 1 1/2", and the special tuning manual called for 1 3/4" SUs for fast road work with hotter cams,increased comp. etc. etc. At 42 mm the Mikunis are nicely inbetween those two in choke size, and I suspect they flow better than standard SUs of either size. They are much more compact than the stock carbs, are mounted on rubber spiggots so are much simpler to fit or remove, and they can use awide array of K&N pancake or conical filters. Of course they are meant forgravity feed in bike applications so you need to put a fuel pressure regulator ( cheap) in the line in order to step down the pressure from the fuel pump. Due to the slight inclination of the stock manifold I had to adjust the float level slightly lower than stock, but once that was sorted it was a 'set and forget' proposition.
One serious benefit is that you don't require the aid of Merlin to set orjet the things. They respond to jetting changes and adjustments exactly as you would expect, which cannot be said for the old SUs. Jets and parts are much cheaper than they are for SUs or ZS units, and they are much moreeasily available through better bike shops.
The only slightly awkward bit in the installation was the choke hook-up.The carbs each have individual plunger chokes, which I linked to the choke cable in the car by means of a dual-carb cable splitter box meant for a Norton Domi. Those are available through classic bike shops, and are notexpensive. You need to do a bit of messing about getting the inner and outer cable lengths right, but it is simple once you get at it.
I've messed about with SUs for the best part of 40 years, but the only reason I'd go back to them would be if I were doing a complete concours resto. For a daily driver or a brisk hobby car the Mikunis are light years ahead of the game.
KH

Not Kevin Hall's MGB, but that of Greg Smith.